Translate

Thursday, January 30, 2025

Eye Candy for Inspiration and Ideas


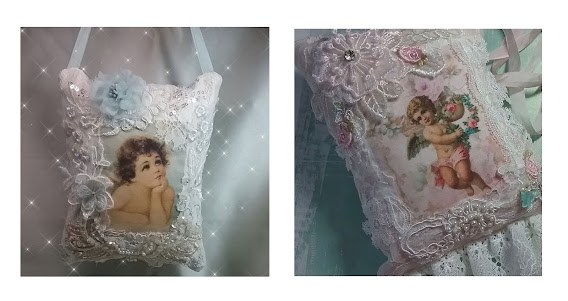
    As shown in an earlier posting of Door Pillow Tutorial

some Eye Candy to give inspiration.


The images shown are from previous stock items in the store.
I do have a constant range of Digitally Printed Fabric Art


The use of a Fabric Collage Print guides the Design and Colours. 

Carol Daisy


TUTORIAL - CRAZY QUILTED GIFT POUCH


Step 1:  Complete a Crazy Patch /Crazy Quilting Block.

My completed block is 16 cm ( 6 1/2 inches) wide x 13 cm  (5 1/4 inches) High.

I have started with the image of this lady featuring poppies and a dove. 


Step 1: I framed her with a selection of dupioni scraps I had available.

 Added a piece of vintage tatted lace in one seam, and a few hand dyed lace flower remnants, a brass key, organza embroidered lace trims.

Step 2: Added Silk Ribbon to the image of the poppies with Ribbon Stitch, also the butterfly and then carried the butterflies in a line through to the side.  Black Kreinik threads in long stitch to form the body, and small french knots for the antenna. For assistance with the butterflies go to the Insect Tutorial. The larger poppies are made as a gathered stitch forming a circle as you go in 7 mm Silk Ribbon. Similar to the

Carnation Tutorial.

Stems and Leaves in 4 mm Emerald Green Silk Ribbon, by tightly twisting the ribbon to form a stem. Pearls  beads added to the organza flowers in the centre and green black beads for the poppies. Seam embellishments Kreinik in gold and brass with addition of complementary seed beads. 


Step 3:  Red Dupioni measuring 21 cm x 16 cm.  (8 1/4 x 6 1/2 inches)

Fold in half wrong side facing out. Place on block which  is facing up as shown in the image below. Machine Stitch down the 3 sides not the top seam.  Overlock the seams and trim the corners to give a softer curve. Turn right side out with the block facing out,  pocket formed at the back and stitched to the Crazy Quilting Block in 1 step.


The extra silk became the band of the pouch. Press with iron for a 1 cm fold and then fold again over  the top edge. As you would with Bias Binding. Press Again and then machine stitch the binding down. Options for Closure:   Press studs, Velcro, Lengths of silk ribbon attached to the bias to tie. Magnetic dots.


Turn this into a gift and gift wrapping all in one, by filling  with a gift of your choice. For example. if you have a specific purpose for this pouch, customise to fit the gift.

Suggestions:  Jewellery, tissue pouch, gift cards, small diary or address book, and for the 

Crazy Quilter or Embroiderer add a selection of needles, needle nest, silk ribbons, threads, embellishments, etc.

Carol Daisy


Violette Pillow Design


Sweet idea for a Gift, they can be left on the Door Handle or
cabinets. Make a slip pocket at the back and have a place 
to hide a fragrance pouch. 


At this time I am not stocking this image, but it will suit most
mini images, such as my Mini Fabric Images. 

Completed size of this pillow 12 x 18 cms.  ( 7 x 5 inches )
Using Satin Fabric with a Pellon Backing for the Embroidered 
Front. Stitch Image in position and create a frame of the laces,
These can then be embellished with Beads, Sequins, Lucite
Flowers and Embroidery. Once completed stitch onto the back
satin piece ( and a small pocket if you wish ). Handle is in 
this case a Rococo Braid. 


Carol Daisy


SLOW STITCHING TIME

 I have had an obsession with Snippets lately, almost OCD. It's just when you get out all the supplies, Laces, Fabrics, Embellishments and start to play with positioning and colour it is very difficult to stop at one. It can be a way of  adding stitches, sequins, ribbon embroidery, buttons, beading, and laces of course.

Many of us have a stash hidden away, of all the odds and ends that are just not enough of to make up a full project but with snippets strips, clusters etc. they can all add up to something beautiful. It is not necessary to be into Journaling to make use of the strips, I will be adding posts at a later date to give some ideas of other purposes. 

For the time being here is this weeks eye candy. 

VINTAGE ANGELS - Ivory  / Blues


SHABBY ROSES SET


VINTAGE GIRL / ROSES


Maybe I have inspired you to rustle up some supplies from your stash, and begin your own. All you need to start is a soft cotton base and small pieces of fabric.

For those who have already discovered snippets, am sure you acknowledge I dilemma, really the days are just not long enough. 

Happy Slow Stitching time.

Carol Daisy


Wednesday, January 29, 2025

JOURNALING - LACE OR FABRIC SNIPPET STRIPS


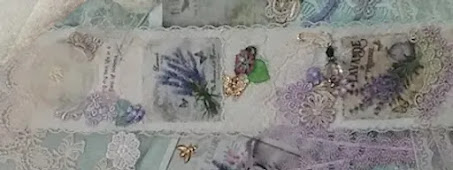
A guide to making up Snippet Strips or Rolls.  This is the way I have found to

be my best option.  I hand stitch all my strips (not Glue ). 

The featured Strip is 7 cm x 30 cm. 


Starting with a strip of Poplin or soft cotton torn to size. then I add a layer 

of fabric.  In this case it is just a Cream Base, position the images to a place I am 

happy with. Find a selection of Laces and Trims etc. and have a play with the

Colours, Positions and Design. 

Next step is to hand tack down the Backing, Images and Laces. I find at times

the sewing machine is suitable but no gathering or tightness this way.  Also 

a slight movement of the piece because of the small scale, can be an added 

bonus. If you are concerned about fraying, I use the pinking shears to trim of the

sides. Also if you are not happy with this look a narrow lace trim edge can be used. 


Then for the Fun of Slow Stitching, adding beads, charms, flowers etc. 

I have completed this into a Journaling Inspiration Pack and will be adding

this to my Etsy Store. Images are from my Lavender Group printed onto 

Cotton available in Store. There will a new range of minis coming soon.

Carol Daisy


ARTFUL THERAPY


Crafting, particularly in the textile arts such as Embroidery, Slow Stitching, and

other forms can be therapeutic and beneficial for mental and emotional health. Also

let's not forget enjoyment, relaxation and satisfaction.

I have been a Crafting enthusiast since my early childhood and hopefully can Inspire

my Customers and Followers to enjoy crafting with the products, packs and

supplies I offer in my Etsy Store. Also Tutorials and Free Designs will be a feature

in this Blog.

The Crafting Therapy that is Slow Stitching


My journey into stitching began in childhood during a time when Hand Embroidery on Linen and Doilies was in ( showing my age now). The stitches I have learnt at that young age have remained a part of my crafting knowledge. It was a time of learning from my grandmother and creating cherished memories. Perhaps it is time for us, as Grandparents, Aunts, or Mothers, to pass on this experience to a generation immersed in a fast-paced, technology-driven world. Crazy Quilters have always had this ability, adorning every seam with intricate stitches, beading, and embroidery in each panel.


The idea that embroidery stitches need not be perfect may linger in the minds of those who have spent little time with a needle and thread. This self-doubt should be discarded when embracing this style. There are no wrong stitches, fabrics, or color choices. The essence lies in free interpretation.


The thoughts of embroidery stitches that don't show perfection is probably in the back of minds of those will very little time spent with a needle and thread. This self doubt needs to be thrown out the door with this style. No stitch, no fabric, no colour choice is wrong. Free interpretation is the key.

Lately, I've been exploring Slow Stitching to better grasp the essentials for assembling a Slow Stitching Pack, and I'm thoroughly relishing the tranquil moments. The items in this shop showcase my passion for crafting, embroidery, and creativity, with my own contribution extending to fabric art design.

Butterfly fabric in the image is from the "Garden Wings" Collection.

I hope that the Store and Blog will inspire a fresh set of individuals to experiment and find the enjoyment that is Crafting.

Carol Daisy 


FRENCH TAGS - MIXED MEDIA - FREE TUTORIAL


These are just great for gift giving.

Do you have hidden away in your sewing stash pieces of lace that are

just too small to put to use, but you cannot bear to part with them. 

This is a way to have it on show.

Bring out such items as:

Small remnants of Lace ( Vintage or Modern ), Doilies - damaged but precious,

Buttons. Charms, Ribbons, Hand Dyed Lace Trim or Motifs

Broken pieces of jewellery, Images Satin Transfers OR Fabric images

For this illustrated tag you will need:-

1 Backing Piece 12 x 22 cm.     1 Fabric Stiffening  10 x 20 cm.

1 Image ( 8 x 6 cm)   Small pieces of fabric to frame the image.

Make up the front panel add pieces of fabric around the image.

Layering is the one plus with this type of craft, the more the better. 

Place the stiffening at the back.

For this example I have placed lace around the image to create a picture frame.


Overlapping where necessary.  Making it wider than the fabric. Hand tack in matching

thread to keep the lace in position. At the base I have added a hand dyed lace motif with a slight touch of blue in the centre which I feel suits the blue in the maids dress.

Pearls stitched into the flower centre. With seed beads I have framed the image,

stitching them to the edge of the lace with a beading needle and beading thread.


Rosette:  

Base-  Is a gathered Rosette in lace.

2nd Layer - Constructed from 13 mm Silk Ribbon.

Make small pleats, hand stitch each one in place, be sure  to leave a tail at each

end to form it into a circle. Total length 8 cm after pleating and allow

an extra 2 cm each end. 

Shape into a circle and stitch ends together and flat against the rosette so it will

not show, then run a gathering stitch through the inside seam and gently pull it together 

into a rosette, finish off well so it will not come undone.

Layer the two together stitch down in place on the lace foundation using a button as the

centre, this will cover all the gathering areas you don't want to show. 

To add balance to the frame 2 pieces of Venice lace leaves cut from a motif, dyed to

match the flowers at the base. Once you are happy with the finished result for the tag, fold

over the laces to the back and slip stitch them down to the stiffening.

Cover it with the backing piece.

Backing:

I pressed the seams down to make it the required size then edged this with a fine 1 cm lace

trim to give an attractive edge. If machine sewing it may be best to do some hand tacking

first to make it easier to handle under the pressure foot with such a narrow lace.

Place it to the back of the French Tag and slip stitch the two pieces together.

All that remains now is to add an eyelet to the top of the tag. The opening for this believe it

or not I have made with a ordinary office whole punch. Should you have the proper

tool it will be simple to do. As an alternative the ribbon could be stitched to the tag,

maybe with a few pleats for disguise.

Ribbons:   Satin, Organza, Silk, Braid or even a length of Lace

can be used to display your French Tag. Let your imagination run wild with different

themes for your tags.

Colourful, Christmas, Birthday, Modern, Vintage, Embroidered.

Place the eyelet as per packet directions.

Consider it as a card for a special occasion, which will be treasured and on display. 

An extra pouch could be added at the back to hold a fragrant envelope.

Much prettier than being hidden away in a sewing basket, don't you agree.

So pull out your Sewing Baskets and get inspired.


Carol Daisy


Textile Art? Discovery, Design, Creativity


Textile art involves using textile materials as the main medium, including

fiber art, knitwear, woven fabric, and embroidery.

The process of creating textile art may include hand stitching, machine work, 

or even using glue.

Engaging in textile art requires a sense of touch and sight, as well as creativity and emotional input.

The benefits of crafting, whether in textile arts, quilting, journaling, embroidery, mixed media, or scrapbooking, are significant.

The goal of this store is to highlight the advantages of hands-on art creation. While I work on projects when time permits, my true passion lies in experimenting with textures, colors, and designs to create packs for customers. The time spent on sourcing materials, especially given the scarcity of local craft suppliers, often hampers the creative process. The kits offered in this store cover a range of activities from journaling and slow stitching to textile arts and crazy quilting.

An exclusive line available in the Store features my art digitally printed on cotton. Utilizing a feature image can serve as inspiration for developing a textile art project, providing color, texture, and theme.

Here are photos of a recent project I worked on, illustrating the steps involved.

It begins with selecting a base cotton and arranging the Fabric Art, followed by creating a frame using Laces and Doily Pieces. Spend some time to determine the right combination and placement to effectively cover and frame the featured print.

Also I find a layer of Pelon at the back does help with stitching down laces and embellishments, giving a softer finish and helping hide the stitching. 


Foundation and Layering with Doilies and Lace 

The Guipure Laces Hand Painted in complimentary colours have added to the effect.

In this instance the panel has been added to an I pad pouch, using a corner of the doily to cover the pouch seal. 


The addition of Hand Dyed Laces and Embellishments

Finding our joy in crafting - Carol Daisy


Crafting, Music, and Creative Chaos: The Unknown Narrative of Getting in the Zone

Craft, Music and Creative Chaos


 Are there days when you wish the worlds worries would fade away, worries would vanish, and stress takes a backseat? 

Picture this: you find yourself in a cozy craft room, surrounded by a delightful mess, tunes that match your mood filling the air. If you're a Devoted Crafter, you might just nod knowingly. Today, as I assemble packs for the store, I dwell on the journey that led me to this point.

My recipe for diving into the creative zone? A restful slumber to kickstart the day, coffee, a touch of chaos in my workspace (because who doesn't love a bit of mess?), and the perfect playlist blaring in the background. The ever-changing rhythm of my favorite songs sets the tone for what's to come.

In the Chaos the drawers brim with possibilities – fabric art in my unique designs, Colour, Textures, Embellishments hopefully to encourage the buyers Creativity. Sometimes, my canvas is digital, taking my thoughts and designing an image to inspire a project. Other times, it's the joy of bringing a project to life and totally immersing myself in the moment.

Crafting is not just a process; it's a journey. Each snip, each stitch, each stroke of the brush adds a layer to the narrative. It's here, in this space of organized chaos, that I find solace. The outside world fades away, leaving room for inspiration to reign supreme.

As I immerse myself in the colors and textures, time seems to drift by. All stress and concerns pushed far into the back of my mind. Your passion may be Embroidery, Quilting, Scrapbooking, Mixed Media, Slow Stitching, Journaling, Knitting, Crocheting for eg. the Therapy is the same, taking our Mind and Soul to our Happy Place.

So, to all the fellow crafters out there, embrace the chaos, dance to the rhythm of your favorite tunes, and let your creativity soar. Let the worries melt away as you lose yourself in the magic of crafting. For in this unknown narrative of getting in the zone, lies the true essence of the crafter's soul - a place where chaos and creativity collide to form something truly beautiful.


Let's find our Happy Place - Carol Daisy


Eye Candy for Inspiration and Ideas

      As shown in an earlier posting of Door Pillow Tutorial some Eye Candy  to give inspiration. The images shown are from previous stock i...